
Testing and Assessments
Do You Know How Much Weight You Should Carry? Determining Your Safe Pack Weight in 10 Minutes
Picture this:
You’ve just finished skinning and quartering a bull elk you’ve worked just about every part of your ass off to kill. Now, you have some roller coaster miles ahead of you. The first stretch of that roller coaster is a steep uphill stretch. Then you have yourself a spicy descent before you hit another long uphill, march. You grab your pack and have a look at the meat as it hangs in game bags; you want to get it all back to the truck as quickly and in as few trips as possible. But there’s a problem — you don’t know how much you should load into your pack at one time.
After a minute or two of thinking, you just say screw it and load your pack with as much as it can carry. You set off and trudge your way up the first climb. You’re absolutely gassed when you reach the top — legs cooked, lungs shot, heart feeling like it’s running a jackhammer while an elephant sits on your chest. A sinking feeling settles in on you, and you start wondering if you made a big mistake loading up all that weight. There’s still a lot of meat left to get out, plus your gear, and you’re not even halfway done with the first trip. Negative thoughts take over. You start calling yourself weak. You tell yourself there’s no way you can handle all the packing ahead.
What if you could avoid all that by knowing how much weight you can safely pack? That way you could look at each load, approximate its weight, and know how much you could haul during each leg of the pack out.
You can. Along with that, you can learn what type of training will best improve your uphill packing ability at a given time.
And you can do all of that in just 10 minutes.
The Demands of Loaded Uphill Hiking Based on Speed, Incline, Body Weight and Pack Weight
Loaded uphill hiking costs your body a lot. I imagine that doesn’t surprise you. But let’s look at some numbers to help it sink in. We’ll start with flat ground and work up to grades.
On flat ground, oxygen demand increases by 10% to 20% with a 20% body weight load. That means your cost of doing business increases significantly over regular walking. The cost depends on your current level of strength and endurance. We see a similar trajectory dependent on speed and grade when hiking unloaded uphill.
At 2mph, oxygen demand increases at about 8% to 9% with each 1% increase in grade. At 2.5mph oxygen demand increases to 10% or 11% with each 1% increase in grade. At 3mph, oxygen demand increases to 12% to 13% with each 1% increase in grade. And at 3.5mph oxygen demand increases to 13% to 14% with each 1% increase in grade. The faster you move uphill, and with each increase in grade, your body needs more oxygen to maintain your pace. Now, let’s add weight, grade, and speed into the equation.
To keep the illustration consistent, we’ll use a 185-pound hunter as an example. The chart below was created using Pandolf’s load carriage equation. It compares loaded and unloaded hiking for 185-pound people on a 0% grade vs a 10% grade, and loaded versus unloaded at increased speeds. I’ll offer commentary below the chart.
(Full disclosure: Pandolf’s load carriage equation often underpredicts the metabolic rate of moving under load by about 20%. To be fair, there are different equipment factors that contribute to the underprediction. So, we are using this for illustrative purposes. The cost could likely be higher. Which makes the importance even more severe.)
Speed | Grade | Unloaded O2 Demand | +20% BW load O2 Demand |
2.0 mph | 0% | 7.7 | 8.7 |
2.0 mph | 10% | 16.7 | 19.5 |
2.5 mph | 0% | 9.7 | 11.0 |
2.5 mph | 10% | 20.9 | 24.5 |
3.0 mph | 0% | 12.0 | 13.9 |
3.0 mph | 10% | 25.5 | 30.0 |
3.5 mph | 0% | 14.8 | 17.2 |
3.5 mph | 10% | 30.5 | 36.0 |
Now, a 10% incline is generally considered moderate intensity. Have a look at the 2mph, 10% grade row. With a 20% of body weight load, oxygen demand increases by about 20%. That’s significant. And that’s on a moderate grade at a normal hiking speed with about 10 more pounds than a day pack’s worth of weight.
Consider that many, if not most, inclines we hike while mountain hunting are steeper than 10%. Also, these calculations were run while factoring in 37-pounds of pack weight. Load outs for multi-day hunts are often heavier than that. Pack out weights are often heavier yet.
So, what does this mean for you and preparing for your hunts?
Well, first of all, it means that you have to be real damn sure you’re ready. And that takes a lot of smart work.
A large portion of that work must be devoted to developing your aerobic engine so you’re as efficient as possible with taking in and utilizing oxygen. As part of that work, you need to get efficient under load. That requires time under your pack on flat ground and on inclines, and it requires base levels of strength, strength endurance, muscular endurance, mobility/stability, and good breathing mechanics.
It also means that the heavier you are, the higher the cost. The oxygen demand doesn’t change all that much from 185 pounds up to 210 pounds. However, the total calorie expenditure per hour. Let’s set the speed at 2.5mph, the grade at 10%, and the pack weight at 20% of body weight. With those numbers, a 185-pound hunter burns an estimated 618 calories per hour, a 200-pound hunter burns an estimated 660 calories per hour, and a 210-pound hunter burns an estimated 700 calories per hour. That energy cost compounds in a hurry. Getting under 200 pounds while maintaining strength is worth it.
As fatigue compounds, so does the cost of moving on terrain with weight on your back. You lose your legs; your lungs catch fire; your heart starts running that jackhammer. Then, not only do you bonk and start questioning yourself, but you also walk yourself into a dangerous situation. We are most likely to get injured when we are fatigued. Now, consider that fatigue while you’re traversing rocks and other uneven terrain with weight in your pack. It’s a prime opportunity for you to snap an ankle.
To avoid all of that, you need some numbers that help you understand where your uphill fitness currently stands and how much weight is reasonable for you to carry. To get them, we’ll have a look at one of our faithful conditioning tests.
A New Look at a Trusted Conditioning Test
A while back, I designed our 10-Minute Step-up Test after researching military and mountaineering protocols. I wanted a test that gave our Packmule members, and me as their coach, a solid snapshot of how well they maintained their output on a hard, uphill hike with weight on their backs. And it does that. Our fittest members maintain a solid threshold pace with 20% of their body weight loaded into their packs. Then I got to thinking.
I wonder if we could also use the test to predict how much weight a hunter could safely carry uphill while also illustrating their current weak points.
Makes sense, right? If a person maintains a certain amount of output (step pace) with a given amount of weight it could be used to reasonably predict how much weight they could safely carry in their pack. It’s kind of like using a rep max to predict a one-rep max. If you can squat 200 for 5 reps, you can estimate that it’s about 90% of your 1-rep max. Which means, you can likely squat about 230 pounds for one rep. So, if you can sustain a given work rate with 20% of your body weight on your back without getting crushed by fatigue, we can make a reasonable prediction of how much weight you can safely pack before you stride yourself into the danger zone.
I went forward with the thought and used some good ol’ computer spreadsheets to come up with a prediction model based on performance during the 10-Minute Step-up Test. It’s not Gospel. But it does give a hunter a great idea of how much weight they could safely load into their packs based on their performance during the test. And it exposes likely limitations based on how well or how poorly a hunter performs. I’ll walk you through why I trust it to do all of that. But first, let’s cover the 10-Minute Step-up Test.
The Packmule 10-Minute Step-up Test
The 10-Minute Step-up Test is simple, not easy.
Here’s the equipment you need to do it:
12” box
Chest strap heart rate monitor
Pack loaded with 20% of your body weight
Rep counting app on your phone
Here’s how to do it:
Get all of your equipment ready. Chest strap on, heart rate monitor app ready, app counter up, box on the floor, pack loaded with 20% of your body weight.
Before you strap on your pack and get going, do 15-minutes of light activity to warm-up before the test. This brings your aerobic system online.
After the 15-minute warm-up, strap on your pack, start up your heart rate monitor, get your counting app up, press start on your 10-minute timer, and start doing step-ups, alternating legs with each step.
Move at your FASTEST SUSTAINABLE pace for 10 minutes. That means it should feel pretty hard, like a 7 or 8 out of 10 on the effort scale. However, you don’t want to come blazing out of the gate and then tank. It’s best if you build speed over the first minute. Be sure to hit your rep counter with each step.
A step counts when the stepping leg is fully locked out at the hip and knee, and the bottom of your non-stepping foot touches the top of the box.
At the end of the 10 minutes, stop your heart rate monitor and record your average heart rate and max heart rate. Check your rep counting app and record the total amount of steps.
Now that you know how to do the test, let’s talk about why it’s a solid tool for predicting your packing capacity.
WAIT, before we move on, I need to reiterate one more thing about this test. It’s based on a common mistake people make when doing it. Move at your fastest sustainable pace. If you are at all comfortable while doing this test, you’re doing it wrong. It should feel hard. Not so hard you’re not sure you can make it through. But it should suck a little. If it doesn’t feel that hard, you won’t get an accurate score. You have to push yourself.
First, It Focuses on the Two Biggest Drivers of Hunting Fatigue
Uphill hiking, in most regards, is vertical work, and that, along with load, is what intensely increases energy and oxygen demand. Loaded step-ups are a solid proxy for that stress. They’re vertical and they’re loaded. Also, the average step distance on a steep uphill climb is 10” to 14”. So, the 12” step height is perfect.
And we know that carrying a load while hiking uphill compounds fatigue over time. Your ability to stave off that fatigue while repeatedly stepping at a sustained pace is a solid indicator of how well you can manage work at heavier loads.
Second, Step-ups are Standardized “Vertical Hiking”
We need the task to be as repeatable as possible because your gait changes with fatigue. Using a regular treadmill test or stairclimber doesn’t account for the gait changes. Also, we want sustained muscular contractions that serve as a proxy for driving uphill. Stairclimbers and incline treadmills are great conditioning tools, but you don’t have to create force to drive up in the same way as you do when hiking. This means that by using the step-ups we can get a better approximation of the actual fueling and oxygen cost of hiking uphill while managing weight on your back.
Third, 10 Minutes is a Good Testing Duration
We’ll start by keeping in mind that we’re using the 10-minute step-up test for training guidance and not laboratory-like precision. As I mentioned earlier, we use it as a guide and not the Gospel. With that out of the way, we’ll get into the justification.
Tests shorter than 10 minutes just don’t tell us what we need to know. You can race through them and never really accrue enough fatigue to say whether or not you’re durable while moving uphill and under load. Longer loaded tests are difficult to repeat, especially for regular folks who are training for hunting. We want repeatability with enough stress to give us the info we’re after. Ten minutes does that for us. It’s enough time to create increased oxygen and fuel demand while moving at the fastest sustainable pace. It’s enough time to see if 20% of your body weight is going to make you crumble.
Fourth, 20% of Body Weight is an Appropriate Testing Load
Twenty-percent of body weight is where we start to see the need for efficiency under load. Energy demand has a meaningful increase. And it’s enough weight to challenge posture and breathing mechanics. Fifteen percent is a bit too light. And 30 percent is unnecessarily heavy in a repeatable testing format. Folks will fatigue much faster, they’ll start moving inefficiently, and they’ll attempt to turn it into an interval workout instead of a sustained effort. That doesn’t teach us what we need to know. We need to learn about mechanical and energy efficiency with sustained output. So, we use the minimal effective dose of weight to do that, then extrapolate beyond that weight. Twenty-percent of body weight also lines up with what other great mountain training systems use. The TFNA 1.000 Step-up Test, devised by the Uphill Athlete folks, uses a 20% load. (More on that in the Pack Capacity Designation section.)
Fifth, We Find the Height of a Hunter’s Load-Bearing Ceiling
How a hunter handles 20% of their body weight tells us a lot about how well they’d handle heavier loads. If it sucks the life out of them over the course of 10 minutes, well, then we’ve found their ceiling. We know that loading a pack with anything heavier than that is a bad idea. But as the number of step-ups increases, the ceiling rises. The higher the ceiling rises, the lower the cost of 20% of their body weight, the more pack capacity they have. Let’s talk a little bit more about that.
Your Pack Capacity Designation
Now, we have ourselves a set of normative numbers to project what a hunter should be able to safely carry in their pack. They range from 300 steps in 10 minutes, or around 30 steps per minute, up to 420+ steps in ten minutes.
Think about it in terms of a projected one-hour climb. 300 steps on a 12” step in 10 minutes projects out to 1,800 feet in an hour, which is a serious bit of work. But here’s the thing, you wouldn’t (or shouldn’t) be hiking that fast, especially with weight on your back. You’re going to cook yourself. However, maintaining that work rate for 10 minutes gives us a snapshot of aerobic conditioning, leg muscular endurance, and efficiency under load. If you can’t maintain a 30-step per minute pace for 10 minutes, that’s not good. From a conditioning standpoint, you’re lacking strength endurance, muscular endurance, aerobic power, and aerobic capacity. It also likely means you shouldn’t be carrying anymore than 20% of your body weight on your back.
At the other end of the spectrum, if a hunter can rip out 40-plus step-ups in a minute with 20% of their body weight on their back, it’s obvious that 20% of their body weight is relatively low compared to what they can safely and effectively haul uphill. At that rate, if they can sustain it, they’ll cover about 2,500 feet in an hour. That’s astronomical and no one is going to move at that pace for an hour. However, we know that a hunter who can manage this work rate for 10 minutes has solid strength endurance, muscular endurance, aerobic power, and aerobic capacity. We also know that their pack capacity is relatively high, as it doesn’t cost them very much to carry 20% of their body weight. Now, we also have performance bands between under 300 and 420 plus.
Here’s a breakdown of our pack capacity designations:
>300 (Red): very low pack capacity
300 - 359 (Yellow): functional, but not high capacity
360 - 419 (Green): high pack capacity
420+ (Elite): very high capacity
It’s a rare day that we see a hunter who’s serious about fitness, and who performs the test correctly, get less than 300 steps. However, we do see a fair amount of Yellow, and we want to move them to Green as fast as possible. A hunter with Green-level pack capacity should be able to handle just about any Western hunt with appreciable weight on their back. A hunter with an Elite score is closing in on elite mountaineer status. They have the foundation to do any mountain hunt in the world. Speaking of mountaineers…
Let’s compare these numbers with the TFNA 1,000 Step-up Test. To achieve their excellent designation, you have to complete the test in 20 minutes or less. That’s a workrate of 50 steps per minute or more. A good score on the test is between 20 and 40 minutes. And 40 or more minutes is poor.
Their excellent rating is obviously at a higher work rate than our elite rating, and sustained for a longer time period. This is where context becomes very important. They are mountaineers. We are hunters. Mountaineers are endurance athletes who typically run small in stature. That means in general movement has a lower energy cost. It also means that if they have any semblance of relative strength and aerobic capacity, which they most certainly would, moving with 20% of their body weight on their back will have a lower relative cost than the average hunter. We are a much broader set of folks when it comes to body size. We also (mostly) aren’t hiking our way into technical climbing. We have similar but different needs, so we will have similar but different fitness expectations. What’s proficient vs exceptional for them as mountaineers is different from what’s proficient vs exceptional for us as hunters.
This all leads us to the ultimate question posed by this article — how much pack capacity do you have based on the outcome of your 10-Minute Step-up Test.
Determining Your Safe Pack Weight in 10 Minutes
Here’s the next step.
You do the 10-Minute Step-up Test.
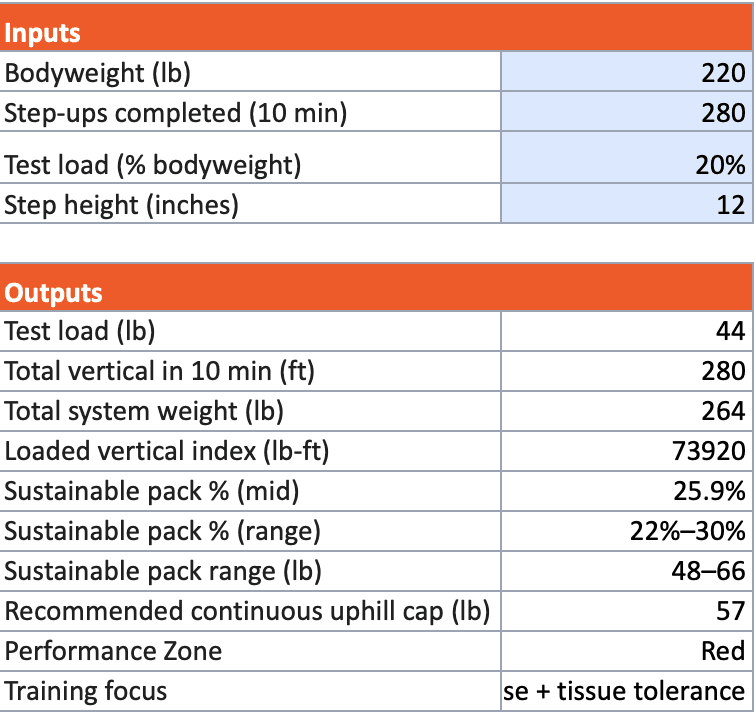
Then, you can use our Free Pack Capacity Calculator to determine the approximate amount of weight that is safe for you to load into your pack for uphill hiking right now. Whether you’re Red or Elite, the amount of work you can sustain with 20% of your body weight gives you a good snapshot of the relative cost. When you enter the amount of step-ups you completed into the inputs section of the calculator, along with your body weight, it gives you an estimated pack capacity based on percentage of body weight. It also offers basic training recommendations.
Again, this isn’t Gospel, it’s guidance. It’s a tool for determining the projected metabolic cost of uphill hiking under load. That metabolic cost determines your rate of fatigue. And your rate of fatigue determines whether or not it’s best for you to load up for an 80-pound pack out. It is a place to start and to help determine your strengths and weaknesses.
On the bright side, if you know an 80-pound load out of some sort is in your future, you learn how much work is required for you to be prepared for it. Clarity is always a good thing, even if the truth is less than ideal. Then it’s time to take the truth and go to work so you don’t end up like the guy from the intro of this article.
Find out the truth for yourself right now, click the link below, enter your info, and download a copy of our Pack Capacity Calculator for Free.


